Get ready to leave behind countless excel spreadsheets, sticky notes and whiteboard plans, because you’re about to revolutionize how you store and track permits!
Creating a new Discharge Permit is easy within the Industrial Pre-treatment section. To get started, navigate to the 'Industrial Pre-treatment' section from the left menu. Once there, you'll find all the tools you need to create and manage your Discharge Permits.
Navigate to the 'Industrial pretreatment' section on the left menu.
Click on 'Discharge Permits'.

To begin the process of creating a new permit, simply select the ‘+ Discharge Permit’ option. This will initiate a two-step process that will guide you through the necessary steps to successfully create the permit.

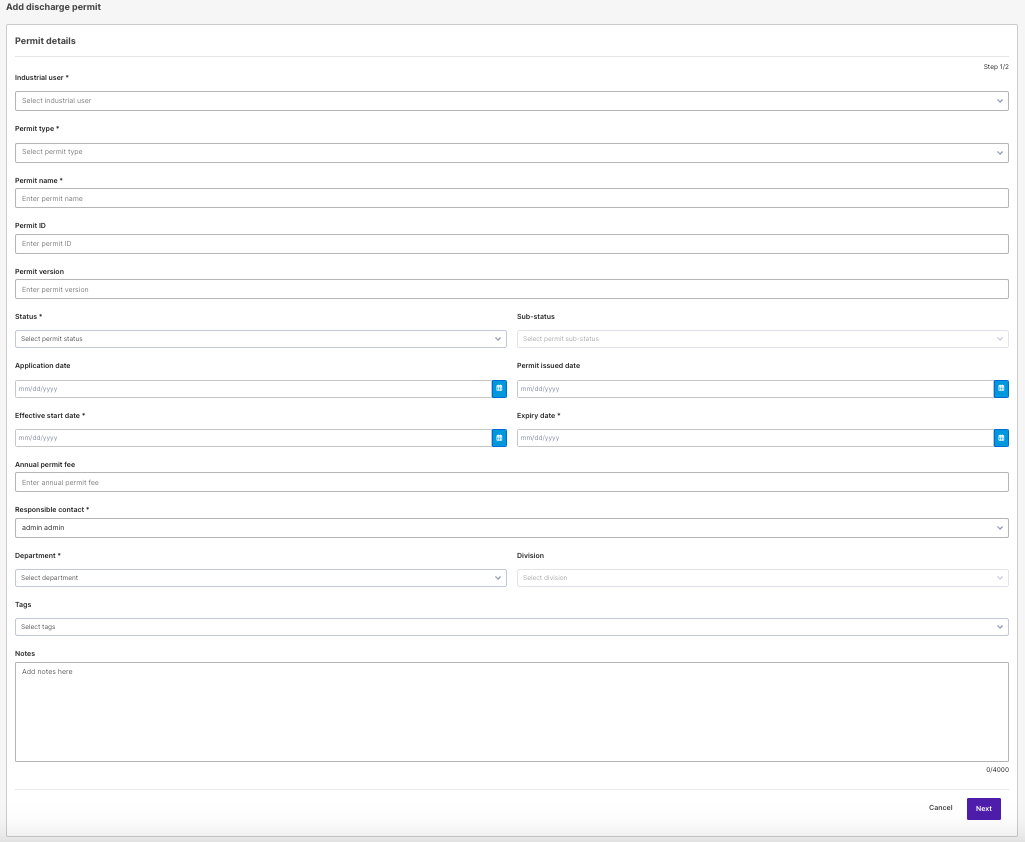
Step 1/2: Permit Details
Input your permit details, ensuring that all mandatory fields marked with an asterisk (*) are completed. Remember, taking the time to double-check your entries and fill in all the required fields will ensure a smooth and successful permit creation process.
Industrial User: Select the user the permit will be associated with.
Permit Type: Choose the appropriate permit type from the pick list menu.
Permit Name: Enter a distinctive name for easy reference.
Permit Details: Enter data for Permit ID, Permit version, Status, and Sub-status where applicable.
Application and Issuance Dates: Specify when the permit application was made and the date the permit was issued.
Annual permit fee: Cost associated with the permit.
Responsible Contact: Name of the Responsible Contact for the permit.
Department and Division: Pick list options to choose the Department and or Division.
Tags: Tags can be applied from choices found on the pick list.
Notes: Area to apply notes for the permit.
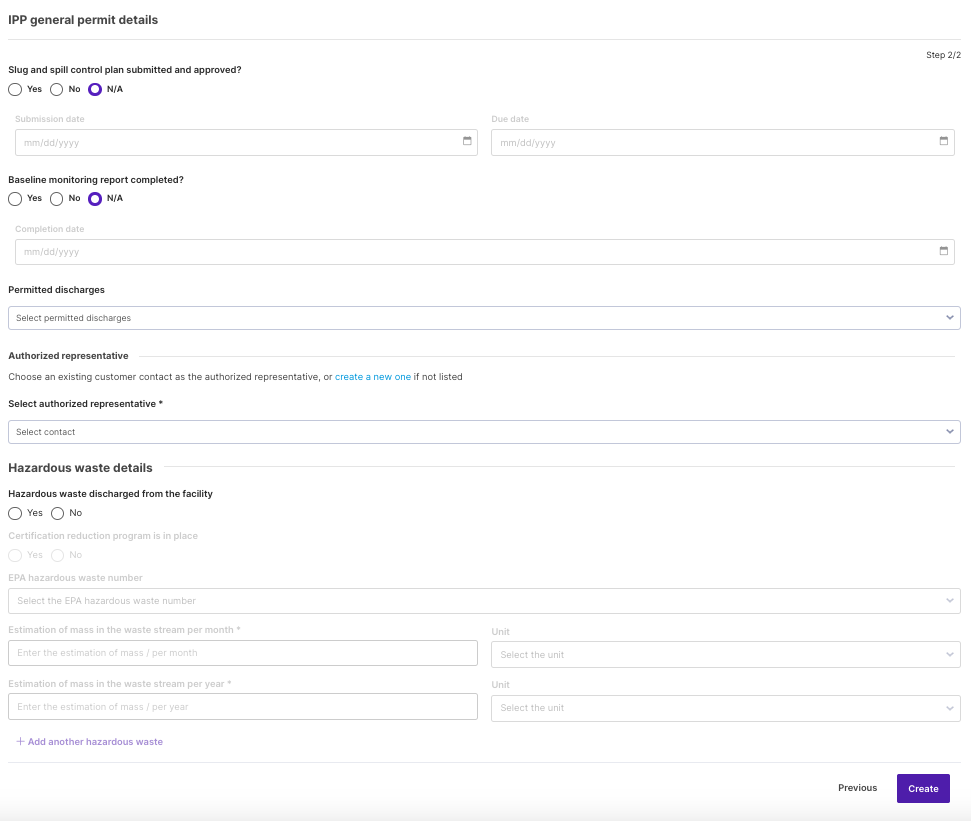
Step 2/2: IPP general permit details
Slug and spill control plan submitted and approved?: Choice of Yes, No, or N/A
Submission and Due Date: Date fields to apply these date values
Baseline monitoring report completed? Choice of Yes, No, or N/A
Completion Date: area to place completion date value.
Permitted discharges: Drop down pick list to choose from permitted discharges.
Authorized Representative: Choose an existing customer contact as the authorized representative, or create a new one by clicking on the blue text if one is not listed.
Select authorized representative *: Choose an authorized person from the provided pick list
Hazardous waste details: Choice of either Yes or no and then fields to add details
Additional Hazardous Waste sections can be added if needed
After you have filled in the necessary details, click the 'Next' button.
This will allow you to finalize and submit your permit.
|
⚠️ Note for Users There are other areas within the system where you can access the ‘+ Discharge Permit’ button to create a new discharge permit. This includes the Facility Permits tab, and the Permits tab of a Non-Domestic customer. By providing multiple access points, Klir ensures that you can easily create a new discharge permit regardless of where you are in the system. Customer Facility: Permits tab
Customer: Permits tab of a Non-Domestic Customer profile.
|


See how easy it was to create a Discharge Permit! Say goodbye to the hassle of older methods and hello to your new streamlined permit creation process
To go to the next article in the Learning Path, Configuring a Limit Set please click here.