![Klir_Logo_Colour-B.png]](https://knowledgehub.klir.com/hs-fs/hubfs/Klir_Logo_Colour-B.png?width=181&height=90&name=Klir_Logo_Colour-B.png)
When a tester reaches out because they can't log in to Klir Connect, the fix is usually one of a handful of things: their contact details are out of date, their portal access isn't set up, their system role is wrong or they've been locked out after too many attempts. This article walks you through checking each one, in order, so you can get them back in quickly.
Throughout this article we use the term tester to describe the service provider contact who is trying to access Klir Connect.
In this article
- Before you start
- Step 1: Find the tester's contact record
- Step 2: Verify the tester's contact details
- Step 3: Check Klir Connect portal settings
- Step 4: Confirm the tester's system role
- Step 5: Unlock a tester who has been locked out
- Step 6: Invite a tester to Klir Connect
- Step 7: Update portal settings for multiple testers
- Step 8: Confirm a notification was sent
Before you start
Ask the tester what they see when they try to log in. Are they told their password is incorrect? That they don't have access? Are they not receiving a code or invite at all? Knowing the error helps you jump to the right section, though it's always worth confirming their contact details along the way.
Step 1: Find the tester's contact record
- From the left-hand menu, go to Customers and select Contacts.
- Use the quick filters at the top of the page (All Contacts, Domestic, Non Domestic and Service Provider) and select Service Provider.
- In the search bar, enter the tester's first and last name. Search supports partial matches, so all applicable results will appear in the list.
- If the tester appears, click their name to open their contact record and move on to Step 2.
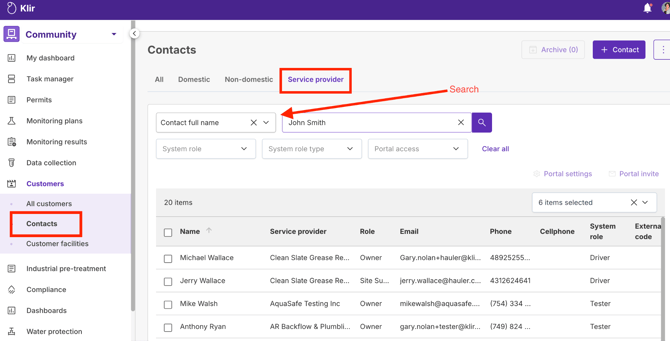
Search isn't limited to names. You can also search by full contact name, service provider, role, email, phone number and cell phone, among other fields.
|
Tip: If a name search comes up empty, try a few different criteria before deciding the tester isn't there. Their name may be spelled differently in the record, so searching by email address or phone number often finds them. |
If you still can't locate the tester, they may need to be added as a contact first. For details, see the Service Providers: How to Create Them (Parts 1 and 2) Knowledge Hub article.
Step 2: Verify the tester's contact details
Opening the tester's contact record brings you to their contact profile, which includes:
- Profile details, including email address and cell phone
- Company associations
- Assets they have maintenance access to
- Portal settings for Klir Connect
- Open tickets
- Licenses and certifications
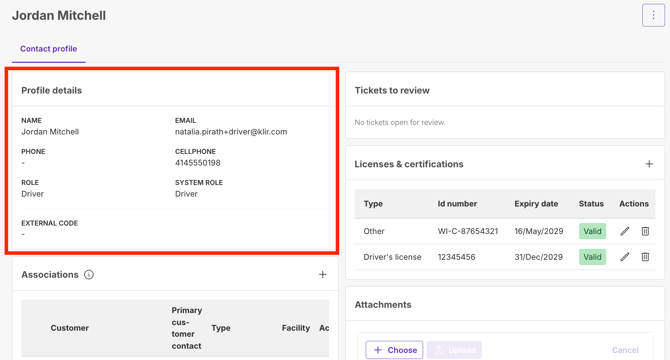
In the profile details, confirm the following are correct:
- Email address. This is where portal invites and notifications are sent.
- Cell phone number. This is used for two-factor authentication, so an outdated number can stop a tester from completing login.
Step 3: Check Klir Connect portal settings
Next, confirm the tester actually has access to Klir Connect.
- On the tester's contact record, scroll to the bottom to the External Portal Settings section.
- If this section is blank, the tester hasn't been given portal access yet. Jump to Step 6 to send them an invite.
- If the section is populated, review the settings listed below.
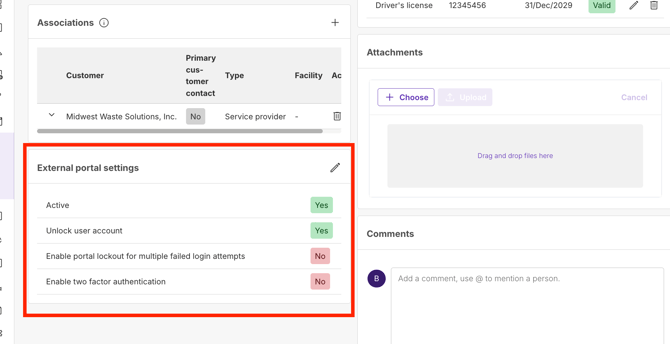
The External Portal Settings section includes:
- Active. This should be set to Yes.
- Unlocked User Account. This should be set to Yes.
- Enable Portal Lockout from Multiple Failed Attempts. When on, the tester is locked out after several unsuccessful login attempts.
- Enable Two-Factor Authentication. When on, the tester receives a code on their cell phone to complete login.
Step 4: Confirm the tester's system role
If Active and Unlocked User Account are both set to Yes, the last thing to check is the tester's system role.
- On the tester's contact record, click the kebab menu (the three dots) in the top right-hand corner.
- Select Edit Contact.
- At the bottom of the pop-up, find the System Role and System Role Type drop-downs.
- Make sure System Role is set to Tester.
- Set System Role Type to Backflow, Hydrant or Cross-Connection tester, as applicable. This field is informational only and doesn't affect access.

If everything above checks out, the tester should have access to Klir Connect.
Step 5: Unlock a tester who has been locked out
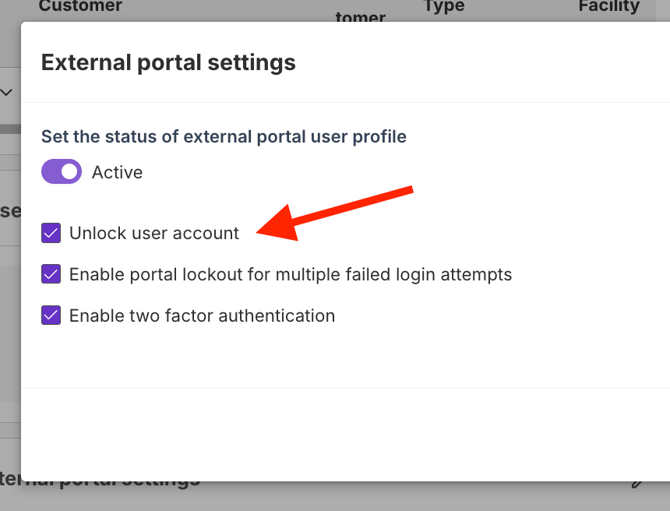
If Enable Portal Lockout from Multiple Failed Attempts is turned on and the tester has had several unsuccessful login attempts, their account may be locked. To unlock it:
- On the tester's contact record, scroll to External Portal Settings.
- Click the pencil icon to edit the settings.
- Check the Unlocked User Account box and save.
|
Note: You can revoke a tester's portal access at any time by setting their status to Inactive. If you're helping a tester regain access, make sure their status stays Active. |
Step 6: Invite a tester to Klir Connect
If the tester exists as a contact but hasn't been invited to Klir Connect, you can send an invite right from the Contacts page.
Check portal access status
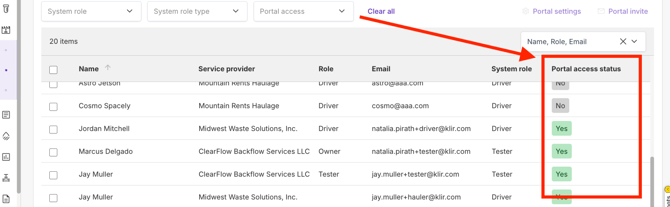
On the Contacts page, under the Service Provider filter, scroll to the right to find the Portal Access Status column. This is a quick way to see where each tester stands:
- Yes. The tester has been invited and has logged in at least once.
- No. The tester has not been invited.
- Pending. An invite has been sent, but the tester hasn't accepted it or logged in for the first time.
- Inactive. The tester has been marked as inactive.
- Locked. The tester is locked out of their account.
Send the invite
- Go to Customers > Contacts and select the Service Provider filter.
- Locate the tester and select the checkbox to the left of their name. You can select multiple testers to send several invites at once.
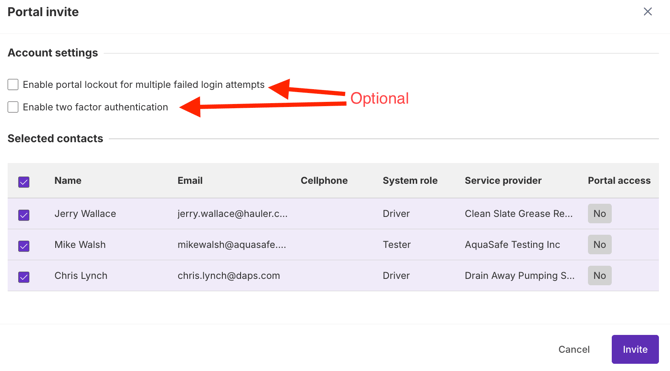
- Click Portal Invite.
- In the pop-up, choose the configuration for these invites, including whether to enable portal lockout and two-factor authentication.
- Review the list of testers at the bottom of the pop-up. Everyone listed will receive an invite with the settings you selected.
- Send the invites.
Step 7: Update portal settings for multiple testers
You can also update portal settings for several testers at once from the Contacts page.
- Select the checkbox to the left of each tester you want to update.
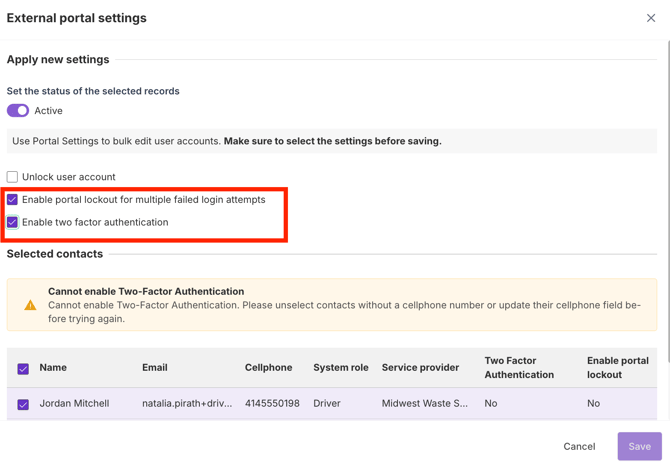
- Click Portal Settings.
- In the pop-up, choose the changes to apply. You can deactivate testers, unlock accounts, enable portal lockout and enable or disable two-factor authentication.
- Save your changes.
Step 8: Confirm a notification was sent
If a tester says they haven't received their portal invite, you can check whether it went out. Klir keeps a record of every email sent, along with SMS notifications.
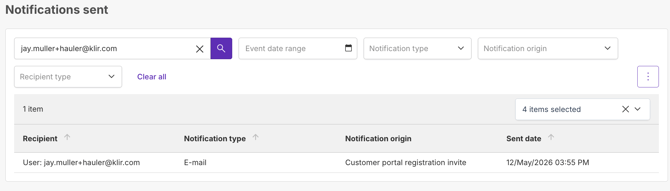
- From the left-hand menu, go to Admin and select Notifications Sent.
- Search for the tester's email address.
- If the tester has received several notifications, narrow the results using the notification origin type filter, for example to show only portal registration emails.
- Click the row for the email you want to review. A pop-up shows exactly what was sent to the tester.

Watch out: This page shows that an email was sent from Klir, not that it was delivered. Bouncebacks and failed deliveries aren't flagged here, so if the tester's email address is invalid the record will still show as sent. If an invite looks sent but never arrived, double-check the email address on the contact record (Step 2).
Still having trouble?
If you've worked through these steps and the tester still can't access Klir Connect, reach out to Klir Support at support@klir.com and we'll look into it further. Including the tester's name, email address and the error they're seeing will help us get to the answer faster.
What's next: Need to add a tester who isn't in Klir yet? Head to Service Providers: How to Create Them (Parts 1 and 2) to set them up, then come back here to send their Klir Connect invite.